Chocolate Strawberry Constellation Cups
Highlighted under: Creative Sweet Recipe Ideas
I absolutely love creating desserts that are not only visually stunning but also indulgent in flavor. These Chocolate Strawberry Constellation Cups are the perfect blend of rich chocolate and vibrant strawberries, making them a delightful treat for any occasion. When I first paired these two ingredients together, the explosion of flavors surprised me! The contrasting textures and sweetness create a heavenly experience that leaves everyone wanting more. Trust me, your friends and family will be in awe of these cute little cups filled with deliciousness.
Making these Chocolate Strawberry Constellation Cups was an experience in itself. I started by melting high-quality dark chocolate, which I carefully drizzled into silicone cups. Using a spoon, I swirled the chocolate, creating an enchanting pattern that would impress anyone. Once cooled, I filled each cup with freshly sliced strawberries that added an irresistible freshness to the treat.
The secret to making these cups truly special lies in the balance of toppings. A sprinkle of sea salt accentuates the chocolate's richness, while a dollop of whipped cream on top completes the constellation look. Every bite is a perfect harmony of flavors, and I can't wait for you to try these!
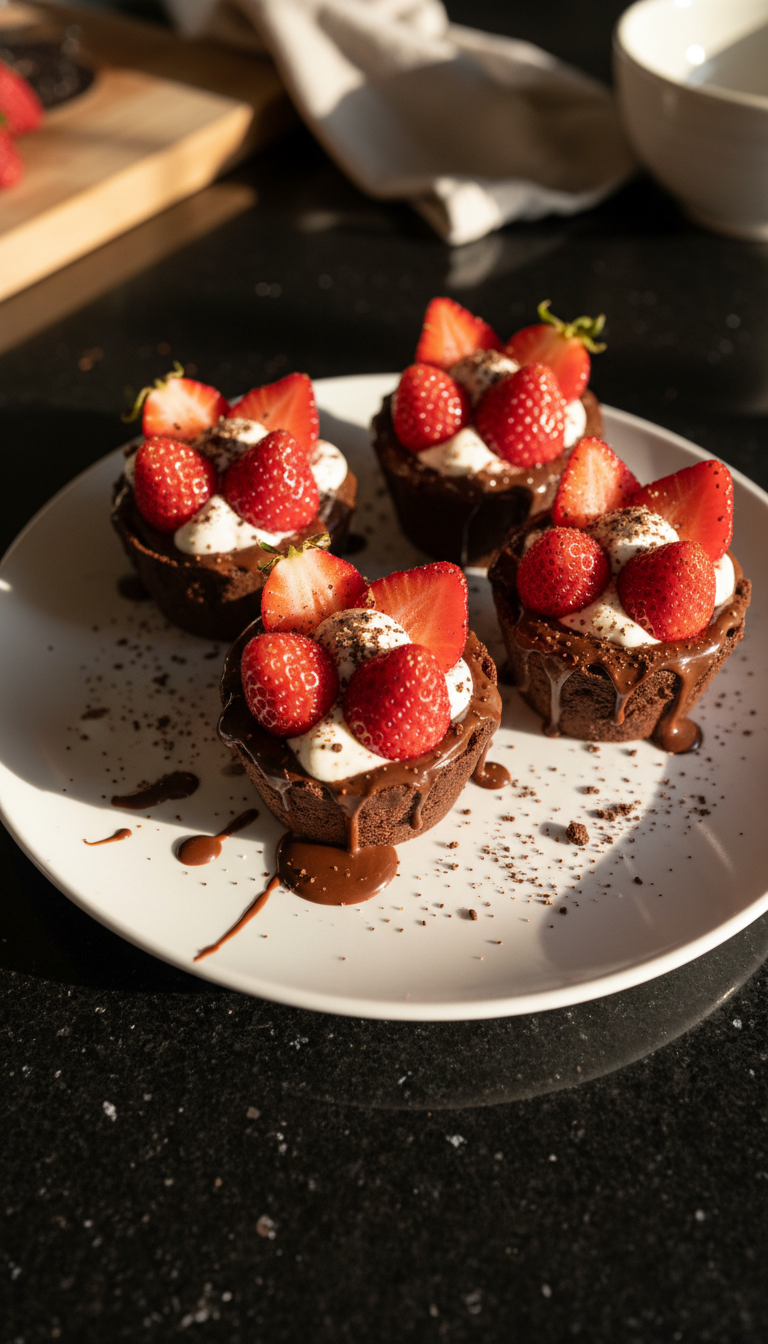
Why You Will Love This Recipe
- Deliciously rich chocolate complemented by juicy strawberries
- Visually appealing presentation to impress your guests
- Easy to make, perfect for any occasion or celebration
The Art of Chocolate Cups
When crafting your chocolate cups, the choice of chocolate is crucial. I recommend using high-quality dark chocolate with at least 65% cocoa for a rich flavor that pairs beautifully with strawberries. The addition of coconut oil not only adds a subtle coconut flavor but also ensures the chocolate sets to a perfect, glossy finish. Melt the chocolate slowly using the double boiler method to prevent burning, or microwave in 15-second intervals, stirring in between until completely melted.
To create beautiful, sturdy cups, it’s essential to allow the chocolate a full 10 minutes to set in the fridge. If the chocolate isn’t thick enough, it may cause the cups to break when you try to remove them from the molds. A good test is to check the edges; they should be firm but not too thick. If you're feeling adventurous, try adding a pinch of chili powder or espresso powder to the melted chocolate for an extra flavor kick!
Strawberry Filling Tips
Selecting ripe strawberries is key to achieving a perfect filling. Look for strawberries that are bright red with a slight sheen, which indicates sweetness and ripeness. If you can’t find fresh strawberries, feel free to use frozen, just ensure they are fully thawed and pat them dry to avoid excess moisture in your cups. Mixing berries can also enhance the flavor—consider adding raspberries or blueberries for a colorful twist.
Whipping the cream to soft peaks is essential for the right texture. Over-whipping can lead to a grainy texture, so stop once the cream holds its shape but still has a smooth consistency. For added flavor, a dash of vanilla extract or a tablespoon of powdered sugar can elevate the whipped cream. Use a spatula to gently fold the whipped cream into the strawberries, ensuring a light and airy filling for your cups.
Serving and Storing
These Chocolate Strawberry Constellation Cups can be prepared a few hours in advance, making them a great option for parties. Just be sure to keep them refrigerated until serving to maintain their structure. If you need to store them, make sure they are in an airtight container; they can last up to 2 days in the fridge. The strawberries might soften slightly, but the flavor will still be delicious.
For a more festive presentation, consider drizzling some extra melted chocolate over the assembled cups just before serving. You can also top them with edible glitter or other fresh fruits to make your dessert pop. If you want to scale up for a larger gathering, simply double the recipe and use a larger baking sheet to set multiple cups at once!
Ingredients
Gather all your ingredients before you start for a smoother process.
For the Chocolate Cups
- 200g dark chocolate
- 1 tablespoon coconut oil
For the Filling
- 300g fresh strawberries, sliced
- 1 cup whipped cream
- Sea salt for garnish
Make sure your strawberries are ripe for the best flavor.
Instructions
Preparation is key to ensure everything comes together beautifully.
Melt the Chocolate
In a heat-proof bowl, combine dark chocolate and coconut oil. Melt over a double boiler or in the microwave in short bursts, stirring until fully melted and smooth.
Form the Chocolate Cups
Using a spoon, drizzle the melted chocolate into the silicone cups, swirling it around to cover the edges. Let them sit in the fridge for about 10 minutes to set.
Prepare the Filling
While the chocolate sets, wash and slice the strawberries. Whip your cream until soft peaks form for a light and fluffy topping.
Assemble the Cups
Once the chocolate has hardened, gently remove the cups from the silicone molds. Fill each cup with strawberry slices, then top with a generous dollop of whipped cream.
Final Touches
Sprinkle a little sea salt over each cup to enhance the chocolate flavor. Serve immediately or refrigerate until ready to enjoy.
Enjoy these delightful treats after a meal or during special occasions.
Pro Tips
- For an added twist, consider experimenting with different fruit fillings such as raspberries or blueberries to complement the chocolate.
Ingredient Variations
If you prefer a lighter option, you can substitute the dark chocolate with white chocolate, though keep in mind that this will change the flavor profile significantly. White chocolate is sweeter, so adjust the sweetness of the strawberries accordingly, adding a bit of lemon juice to balance it out. Plant-based alternatives for whipped cream, like coconut cream or cashew whipped cream, are also delicious substitutes for those following a dairy-free diet.
For a nutty flavor, consider adding crushed nuts like pistachios or hazelnuts as an additional layer in the cups. These can provide a delightful crunch that contrasts with the creamy filling. Just ensure you chop them finely so they complement the overall texture without overwhelming the delightful chocolate and strawberry combination.
Troubleshooting Common Issues
If your chocolate cups have a cloudy appearance after setting, this could be due to moisture. Ensure that your melting bowl and utensils are completely dry to avoid moisture getting into the chocolate. Additionally, if the chocolate is too thick to coat the sides of the molds, it may not have been melted enough. Return it to the heat and stir until it’s fully pliable and smooth before pouring.
If your whipped cream doesn’t hold its shape, it might be due to insufficient whipping. Be patient and keep a close eye. If you find yourself in a pinch with over-whipped cream, you can try to salvage it by gently folding in a small amount of fresh, unwhipped cream to lighten it back up. This will restore some of the fluffiness while maintaining the required sweetness.
Questions About Recipes
→ Can I use milk chocolate instead of dark chocolate?
Yes, you can use milk chocolate, but be aware it will make the cups sweeter.
→ How long can I store these cups?
You can store them in the refrigerator for up to 2 days. However, it's best enjoyed fresh.
→ Can I make these cups ahead of time?
Certainly! You can prepare the chocolate cups a day in advance and fill them right before serving.
→ What other toppings can I use?
You can use nuts, sprinkles, or even a drizzle of caramel for variety.
Chocolate Strawberry Constellation Cups
Created by: The Whiskwonderfood Team
Recipe Type: Creative Sweet Recipe Ideas
Skill Level: Intermediate
Final Quantity: 6 cups
What You'll Need
For the Chocolate Cups
- 200g dark chocolate
- 1 tablespoon coconut oil
For the Filling
- 300g fresh strawberries, sliced
- 1 cup whipped cream
- Sea salt for garnish
How-To Steps
In a heat-proof bowl, combine dark chocolate and coconut oil. Melt over a double boiler or in the microwave in short bursts, stirring until fully melted and smooth.
Using a spoon, drizzle the melted chocolate into the silicone cups, swirling it around to cover the edges. Let them sit in the fridge for about 10 minutes to set.
While the chocolate sets, wash and slice the strawberries. Whip your cream until soft peaks form for a light and fluffy topping.
Once the chocolate has hardened, gently remove the cups from the silicone molds. Fill each cup with strawberry slices, then top with a generous dollop of whipped cream.
Sprinkle a little sea salt over each cup to enhance the chocolate flavor. Serve immediately or refrigerate until ready to enjoy.
Extra Tips
- For an added twist, consider experimenting with different fruit fillings such as raspberries or blueberries to complement the chocolate.
Nutritional Breakdown (Per Serving)
- Calories: 250 kcal
- Total Fat: 18g
- Saturated Fat: 10g
- Cholesterol: 40mg
- Sodium: 50mg
- Total Carbohydrates: 22g
- Dietary Fiber: 2g
- Sugars: 15g
- Protein: 3g